Home /MMC Closed Type Sampler
MMC Closed Type Sampler CST- F/R CST-F/B
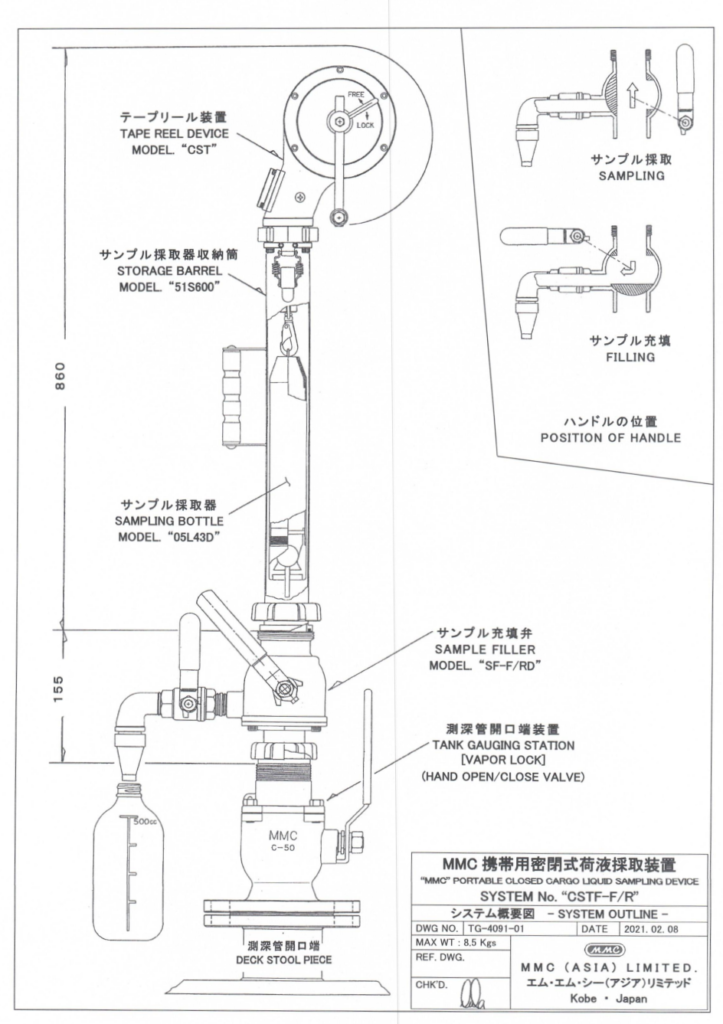
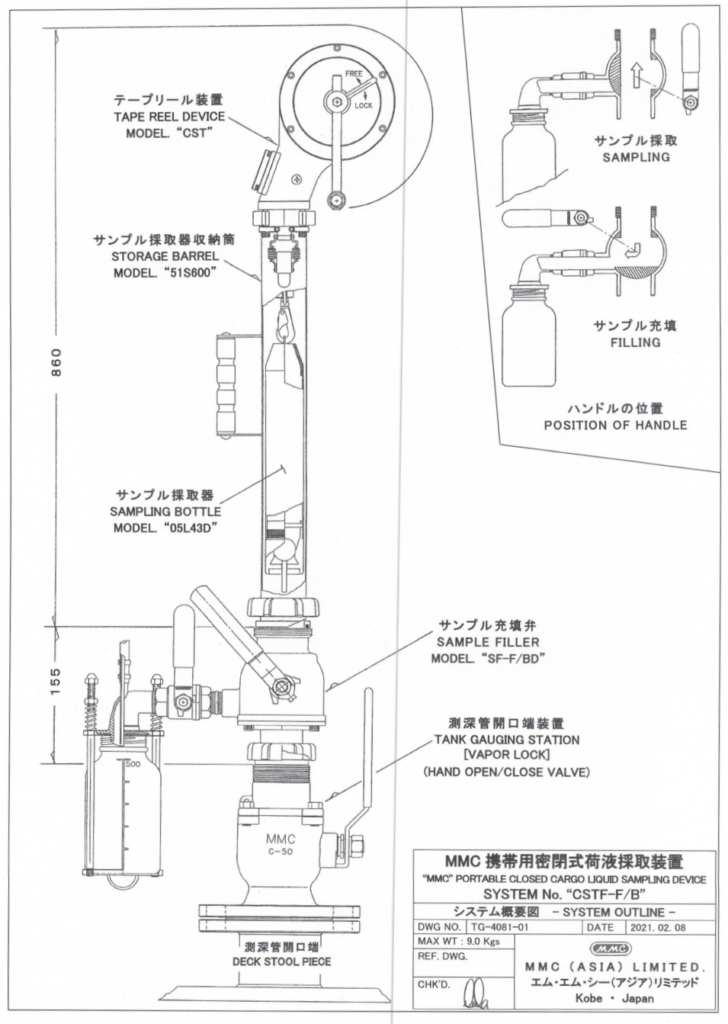
The “MMC” Closed Cargo Liquid Sampling Device is a portable unit that can be easily connected to the “MMC” Tank Gauging Station (Vapor Lock Valve) located on the tank top. This device allows liquid samples to be collected from any desired level within the tank while preventing the release of harmful vapors.
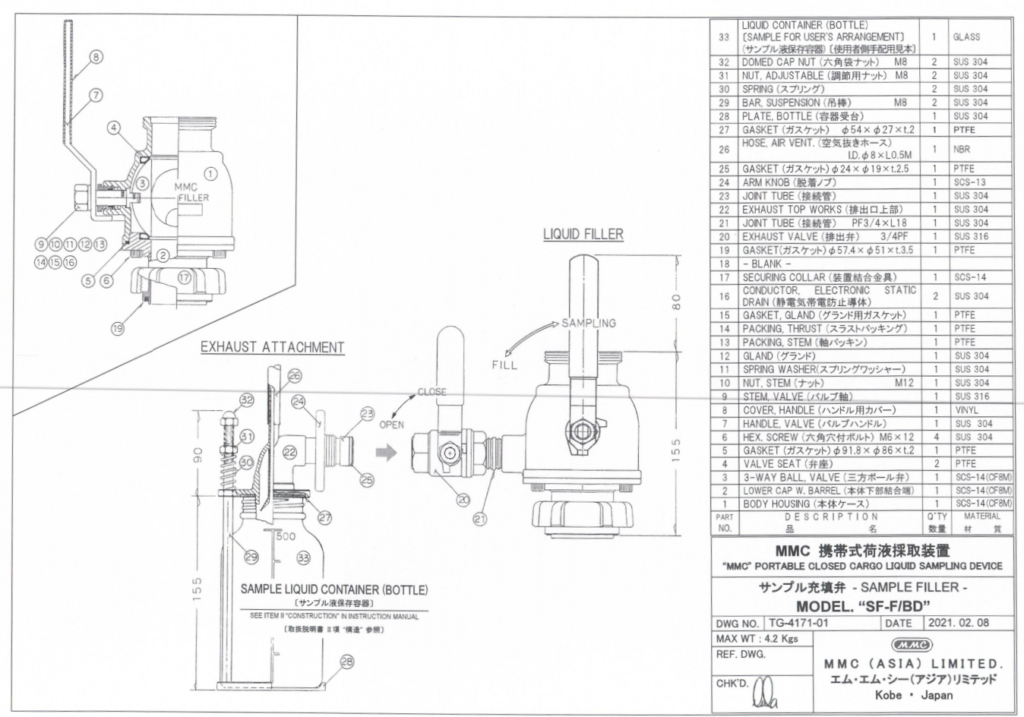
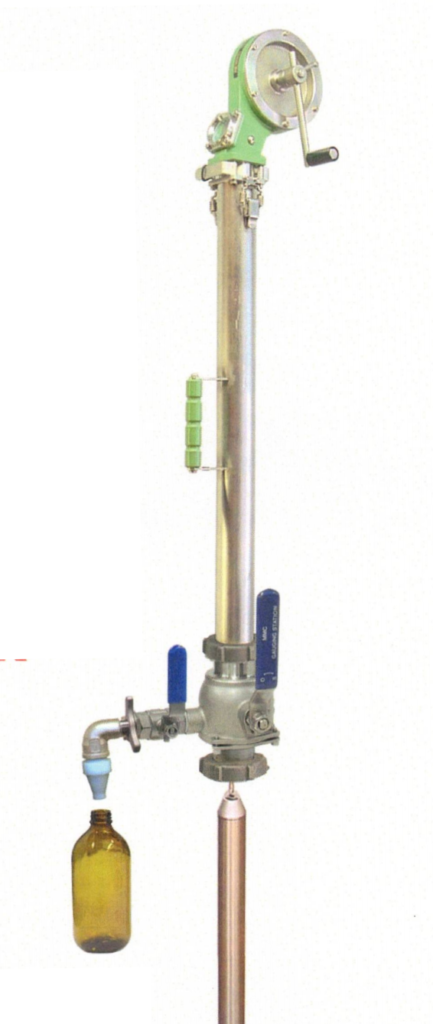
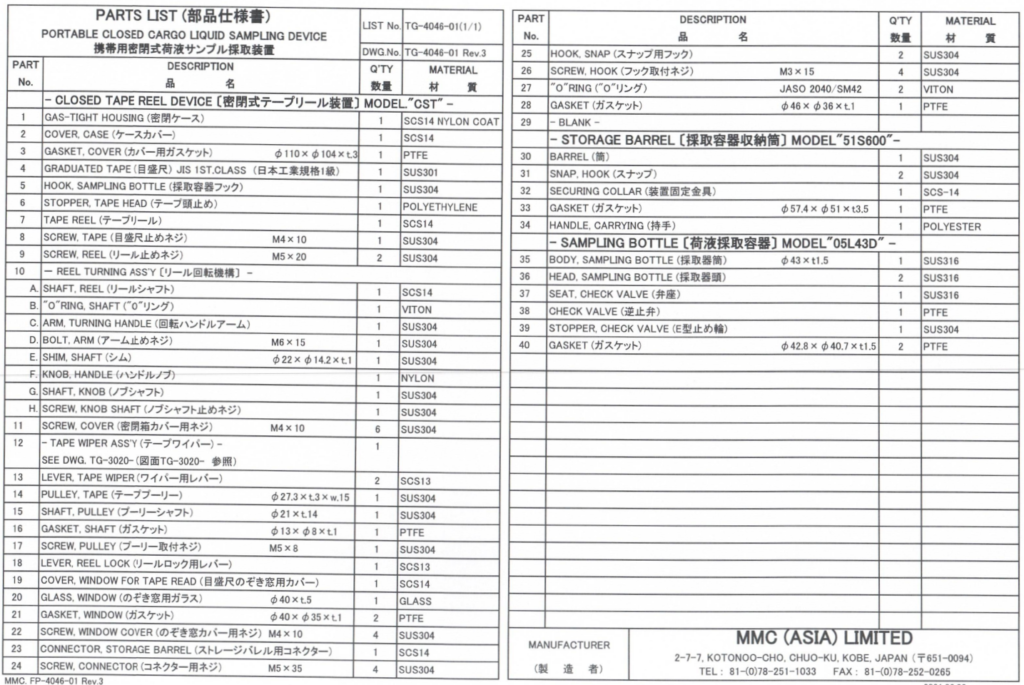
The device comprises the following components: Tape Reel Device, Storage Barrel, Liquid Filler, and Sampler.
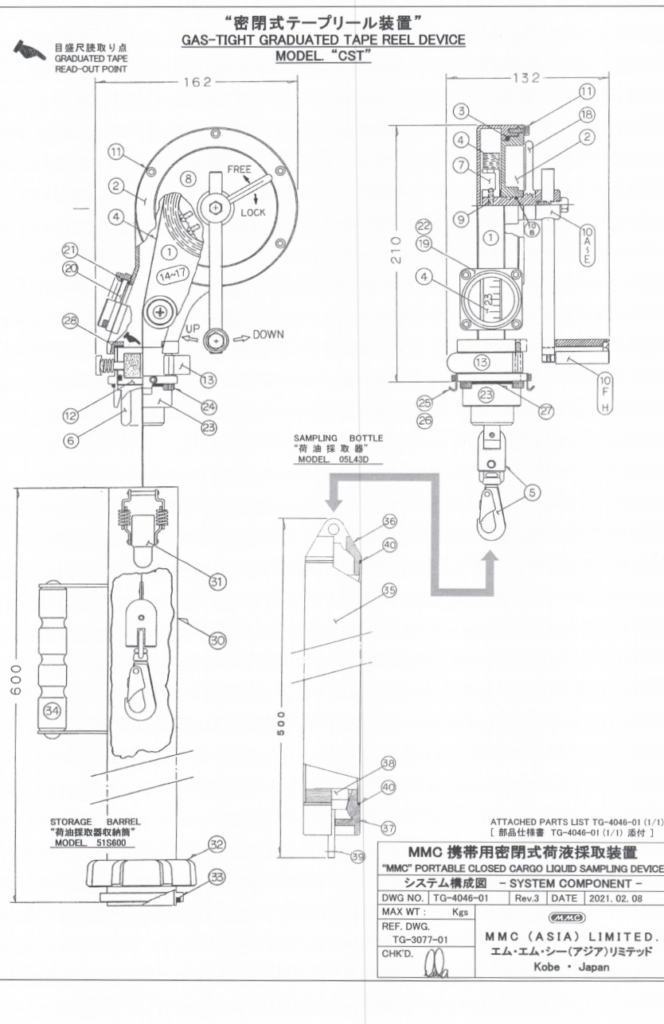
Tape Reel Device (Model “CST”): This gas-tight system is designed for safe chemical cargo sampling. It features a handle mechanism that rotates the tape reel, allowing the sampler to be lowered or raised within the tank. The reel contains a graduated stainless-steel tape (JIS 157 class), with a hook at the end to secure the sampler.
Cargo Liquid Sampler (Model “05L43D”): This 0.5-liter sampler is bottle-shaped to smoothly pass through the tank’s sounding pipe, minimizing contamination risks from dust or rust. Sampling can be performed at any desired depth using a pumping action, facilitated by a check-valve mechanism located at the bottom of the sampler.
Storage Barrel (Model “51S600”): This barrel is used to store the sampler and connect the tape reel device with the liquid filler.
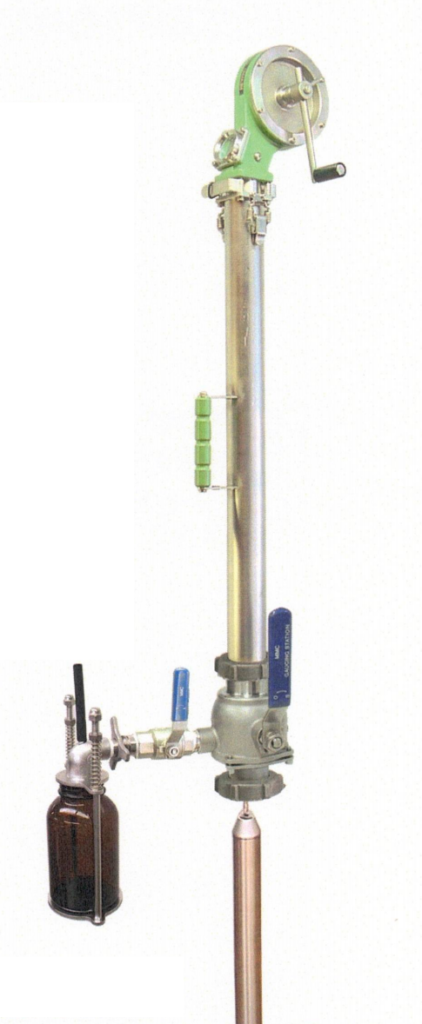
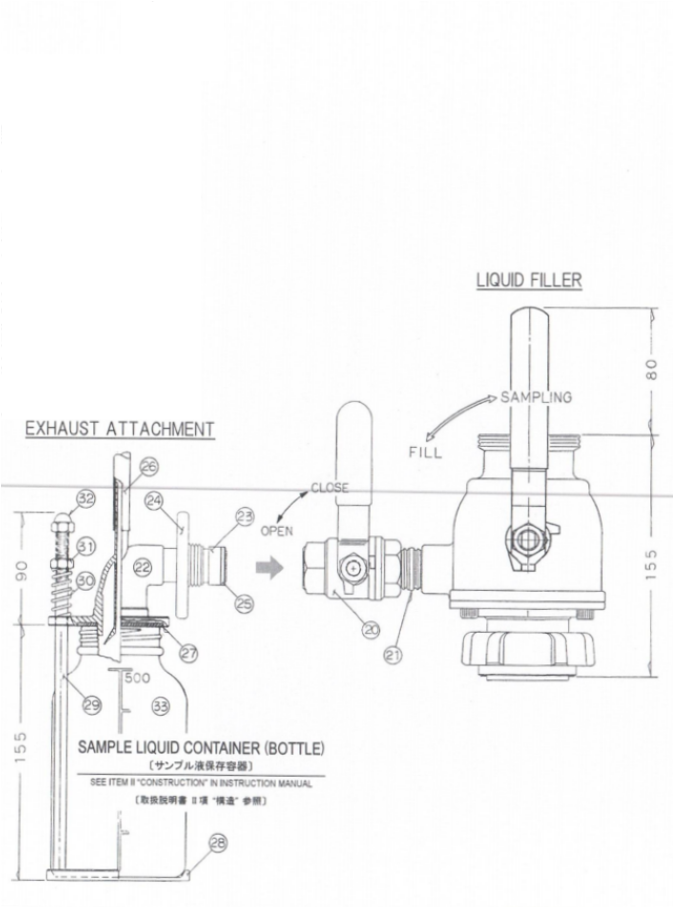
- Liquid Filler (Model “SF-FD”) with Exhaust Attachment: These components enable the liquid sample to be transferred into a container via a 3-way valve that allows for either sampling or self-filling, (Model “SF-F/BD”) with Exhaust Attachment: The liquid filler transfers the sampled liquid into a container (glass bottle) through the operation of a 3-way valve, allowing for sampling or self-filling.
This sampling device is designed to be attached to the “MMC” Tank Gauging Station (Vapor Lock Valve) models “C-50” or “F-50,” allowing liquid samples to be collected without releasing hazardous vapors from the cargo tanks.
Typically, liquid containers (such as glass bottles) are provided by cargo owners or surveyors at the port terminal. When using a narrow-neck liquid container, the bottle should be held by hand at the exit of the exhaust attachment, taking care to avoid spills.
For a more secure, gas-tight filling process, MMC offers an optional exhaust attachment with a bottle holder. In this case, a wide-mouth liquid container can be used, with specifications including an internal diameter (ID) of 28-40mm, an external diameter (OD) of less than 50mm, and a capacity of 0.5 liters.
Models
- CSTF-F/B
- CSTF-F/R
The CSTF-F/B and CSTF-F/R are both portable closed sampling devices used for cargo liquid sampling, but they have distinct differences in their features and applications.
GET IN TOUCH WITH US >>
CSTF-F/R (Manual-Filling Type)
CSTF-F/R (Manual-Filling Type)
- Primary Use: Designed for manual filling operations, where the sample needs to be manually extracted from the sampler and transferred into a container.
- Construction: This model lacks the automated self-filling system found in the CSTF-F/B, meaning the sample is extracted manually.
- Compatible with Containers: More flexible in terms of container types, but the transfer process is less automated and involves manual handling.
- Sampling Process: Requires more operator involvement during the filling process, making it suited for environments where manual oversight is preferred.
- Ease of Use: Best for controlled manual sampling tasks, where precision and slower transfer rates are important.
CSTF-F/B (Self-Filling Type)
CSTF-F/B(Self-Filling Type)
- Primary Use: Designed for self-filling sampling where the liquid sample can be transferred directly into a container (e.g., glass bottle) without removing the sampler from the device.
- Construction: Includes a self-filling mechanism, allowing for automatic liquid transfer using a 3-way valve, reducing the need for manual handling.
- Compatible with Containers: Primarily designed for wide-mouth containers but also offers an option for narrow-mouth containers with a specialized attachment.
- Sampling Process: The focus is on seamless liquid transfer from the sampler to the container, with minimal exposure to hazardous vapors.
- Ease of Use: Ideal for situations where frequent or rapid sampling is required without disassembly between operations.
Operation Instructions
- Assembling the Device
Attach the Sampler to the hook of the Tape Reel Device, and assemble the Storage Barrel, Liquid Filler, and Exhaust Attachment. Ensure the Securing Collar on the Storage Barrel is tightly fastened. - Connecting to the Tank Gauging Station
Remove the cap from the Tank Gauging Station located on the tank top and attach the assembled sampling device. Tighten the Securing Collar of the Liquid Filler securely. - Setting Up for Sampling
Turn the Liquid Filler Handle to the “SAMPLING” position (12 o’clock), and set the Exhaust Valve handle to “CLOSE” (12 o’clock). Then, open the valve of the Tank Gauging Station by positioning its handle to 12 o’clock. - Lowering the Sampler
Hold the Tape Reel Handle and loosen the Reel Lock by turning it counterclockwise. The Sampler will descend by its weight.
[Caution: Free fall of the Sampler is prohibited.]
Since the cargo liquid and Sampler are heavy, carefully control the Handle when lowering or lifting the Sampler. - Sampling Process
Monitor the graduated tape and lower the Sampler to the desired level inside the tank.
Use the handle to perform a jiggling motion at the required level to allow the liquid to enter the Sampler through its check-valve. - Lifting the Sampler
As the Sampler is lifted, the Tape Wiper can be used to clean the tape.
When the Sampler reaches near the deck level, wind the tape slowly, ensuring the Sampler is fully secured inside the Storage Barrel. Lock the reel using the Reel Lock.
Turn the Liquid Filler Handle to the “FILL” position (9 o’clock). - Filling the Liquid Sample
Loosen the Reel Lock and carefully lower the Sampler, allowing the collected liquid to fill the Liquid Filler and Storage Barrel.
Place the Liquid Container (glass bottle) at the exit of the Exhaust Attachment. Open the Exhaust Valve on the filler (Handle at 9 o’clock) to transfer the liquid sample into the container. Once filled, close the Exhaust Valve (Handle at 12 o’clock). - Storing the Sampler
Turn the Handle of the Tape Reel Device to retract the Sampler fully into the Storage Barrel, then lock the reel with the Reel Lock. - Dismounting the Device
Close the Tank Gauging Station valve by turning its handle to 3 o’clock. Detach the sampling device from the Tank Gauging Station and securely fasten the Tank Gauging Station cap.
Spare Parts


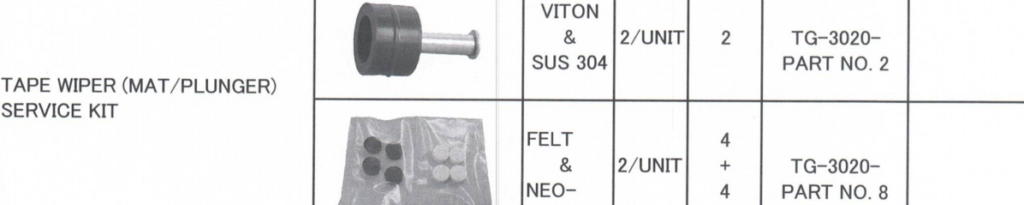


TAPE WIPER ASSEMBLY for “MMC” Cargo Liquid Sampling Device (Model CSTF)
The Tape Wiper Assembly is a crucial component of the “MMC” Cargo Liquid Sampling Device designed to clean the surface of the graduated tape when it is wound up after sampling cargo liquids, such as oil, from a tank. This process ensures that any dirt or liquid adhered to the tape is removed efficiently. The wiper presses gently on the tape to clean it, preventing contamination or the buildup of hazardous materials.
Key Features
Purpose:
- The wiper is used to clean the graduated tape as it is wound up after sampling. It removes adhered liquid or dirt from the tape surface.
Easy Operation:
- The wiper is operated manually by pressing the levers with the thumb and finger while the tape is being wound up.
- The force applied should be adjusted to match the load of the winding process.
Controlled Pressure:
- Excessive force on the wiper lever can generate heat due to friction, so careful control of pressure is necessary.
Long-term Storage Maintenance:
- It is recommended to clean the inside of the Tape Wiper Assembly if the sampling device will be stored for an extended period.
Disassembly & Cleaning Process
- Detaching the Tape Wiper: The Tape Wiper Assembly is fitted in the connector’s upper part of the Storage Barrel. Remove the Storage Barrel and the four bolts of the connector to dismantle the assembly from the reel.
- Disassembly of the Wiper: Take off the Tape Wiper Assembly from the connector. Remove the screws from the wiper housing and the “O” ring to split the housing into two blocks. Detach the housing from the graduated tape.
- Complete Disassembly: Remove the screws from the wiper mat plunger to fully disassemble the wiper. Replace the wiper mats if they show signs of deterioration.
- Cleaning: Clean the inside of the Storage Barrel and the Tape Wiper Assembly thoroughly.
- Reassembly: Reassemble the wiper housing and ensure the graduated tape moves smoothly through the wiper.
- Insert the Tape Wiper Assembly into the connector and refit it onto the reel body.
Secure the Storage Barrel by snapping or hooking it into place.